|
Rittners School Of Floral Design
In Boston Presents....
 How To
Make A Lovely Basket Arrangement Of Flowers How To
Make A Lovely Basket Arrangement Of Flowers
Most people love a big basket flowing with the abundant and rich
look of a wide variety of flowers. These designs can be used for so many purposes.
They are ideal for an entry way or hall. They make wonderful and impressive
gifts. They can be used for decorating a large function space. The style
is often used in lobby areas.
Yet, for the beginning floral designer
making a design like this can seem quite intimidating, for they look so
complicated and hard to make.
At Rittners Floral School our job is to make
learning floral designing easy and fun. We want you to see how you can
make a floral design that will be the envy of all of your friends and be
greatly appreciated by your loved ones.
What You Will Need
Basket Container With A Liner
Foam
Several Bunches of Snapdragon
10-20 Carnations
1-2 Bunches of Pom Pons
1 Bunch of Miniature Carnations
A Little Statice
10 Roses
Spanish Moss
We start this design by placing our piece 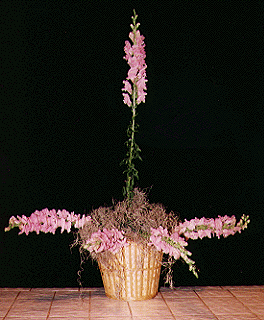 of foam into a container. The
base that we are using is a wicker basket. Baskets have always
been popular. However today they are even more popular than ever
before, and florists are importing them from all over the world.
The important thing that you realize is that when working with a basket
you must have some sort of plastic liner to place inside prior to placing the
foam. If you do not take this precaution, you will have water leaking
all over the place.
Place the foam into
the container, and then using specialized florist tape, attach it in place
to the top
of the base.
of foam into a container. The
base that we are using is a wicker basket. Baskets have always
been popular. However today they are even more popular than ever
before, and florists are importing them from all over the world.
The important thing that you realize is that when working with a basket
you must have some sort of plastic liner to place inside prior to placing the
foam. If you do not take this precaution, you will have water leaking
all over the place.
Place the foam into
the container, and then using specialized florist tape, attach it in place
to the top
of the base.
The overall shape of this design is roughly a half a sphere. If you think
of the northern hemisphere of the earth you will have the idea. To establish
that, we start with our snapdragon. Snapdragons are a lovely flower, and
come in a variety of colors. The tall spikey shape enables us to form the
general boundaries of this design. First we place a snapdragon into the
center of the design. Next we place a few more along the baseline,
working around in a circle.
Notice that in covering our mechanics we
have used spanish moss. This is placed very loosely so that we can continue
to add stems of flowers. If you find that it is hard to get your stems
into the foam through the spanish moss, place the flowers first and add
moss at the end of your designing. Alternatively if you don't like moss,
you can certainly use any of a wide variety of foliages (eg. plumosa,
ming fern, etc.)
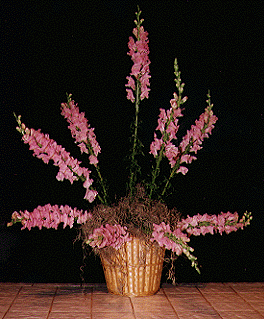 Once we know how
tall we want to make the design, and how far out we want to come along
the sides, we take more of our snapdragon and fill in, working the flowers
in between the top single flower and the flowers on the sides. You can see
that as we start to fill in the gap between the top and the base, how the
overall design is starting to take shape. Once we know how
tall we want to make the design, and how far out we want to come along
the sides, we take more of our snapdragon and fill in, working the flowers
in between the top single flower and the flowers on the sides. You can see
that as we start to fill in the gap between the top and the base, how the
overall design is starting to take shape.
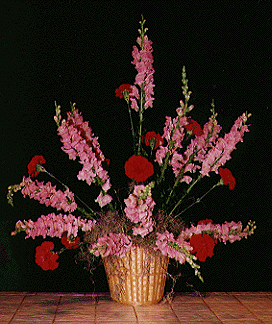 After we place all of our snapdragon, let's change to another flower.
In this case we are adding some red carnations. The contrast is an interesting
one. Snaps are a spike flower. Carnations are a face flower. The placement
of the carnations starts with one on the top slightly to the side of the center
middle snapdragon.
Then we place some carnations down at the baseline. Finally
place carnations in between the top flower and the base line. The overall
effect is to start filling in some of the void. The carnations
help, but the design still looks empty. So let's go on to the next step. After we place all of our snapdragon, let's change to another flower.
In this case we are adding some red carnations. The contrast is an interesting
one. Snaps are a spike flower. Carnations are a face flower. The placement
of the carnations starts with one on the top slightly to the side of the center
middle snapdragon.
Then we place some carnations down at the baseline. Finally
place carnations in between the top flower and the base line. The overall
effect is to start filling in some of the void. The carnations
help, but the design still looks empty. So let's go on to the next step.
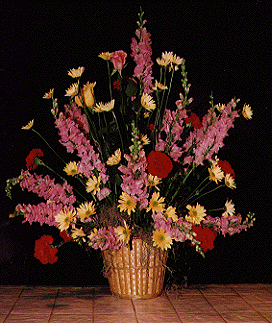 Let's take
another flower, in this case some pom pons. and continue to fill in. The variety
that we are using is the daisy pom, which actually looks somewhat like
a daisy, but has a much longer stem, and lasts a lot better. Poms generally
have multiple florets on a stem, and so to get the greatest possible
coverage, let's thin the stem out a bit, placing some of the shorter flowers
down near the base. By doing this we are able to get an enormous amount
of coverage from our flowers. Place the flowers first at the top, then
down at the base, and finally in the center. Turn the design around as
you add the flowers, so that your placement will be even on all sides.
This is a design meant to be viewed on all sides. Next start adding a few
roses into the mix.
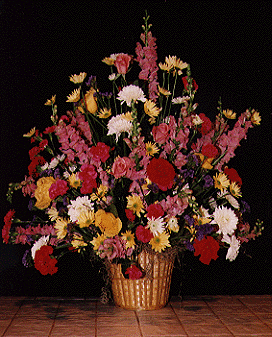
After adding
our roses to the design, we add a few other flowers, mixing them
through the entire unit. A second variety of poms are used here, white
cushion poms, and then a bunch of miniature carnations. Finally some
statice is used to provide texture & contrast.
The overall effect is very rich. Notice that we are using both more
pricey flowers such as snapdragons and roses, and mixing them with
common poms & carnations. There are some designers who get very
snobby about their mixtures. As I think you can see in this example,
mixing a few more expensive flowers with a few more common varieties
can still give a very nice effect. It can also help you control your
costs as these designs can become quite expensive. In other words,
try not to limit yourself with
regards to flower selections.
We hope that you really enjoyed this brief floral design lesson. At
Rittners Floral School in Boston we provide
floral design instruction that includes a wide range of different
styles and techniques. Please come and take one of our hands-on
workshop programs!!
Rittners Floral School Gallery
returns you to our gallery page.
Your Webmaster is Dr. Steve Rittner, who may be reached at Stevrt@tiac.net.
All photographs and text on
this page are Copyright - Rittners School,
and may not be reproduced, or used for any commercial purposes.
|