|
Rittners School Of Floral Design
In Boston Presents....
 A Christmas Centerpiece A Christmas Centerpiece
The traditional Christmas centerpiece is a favorite of many. This design is very easy to construct, and one that will get a very positive reaction from your family and friends.
What You Will Need
A piece of Styrofoam (of two inch thickness)
Balsam
Two candles
Six Cones
Glass MM. Balls
#40 ribbon
#20 Wire for hairpins
Ornament such as a Santa or Reindeer

This design is a very traditional piece. It was originally constructed upon a birch branch base. (You may still find some of those being sold even in the present day!) In our interpretation, we take a piece of two inch thickness styrofoam and cut a section approx. 5 to 6 inches wide. This gives us an easier base upon which to work.
With a small saw, carefully bevel the edges on the top of the styrofoam. This will enable you to attach the foliage so that it will lean over the sides.
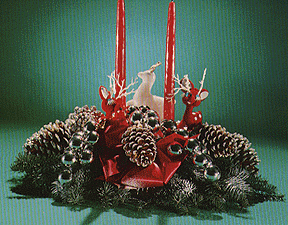
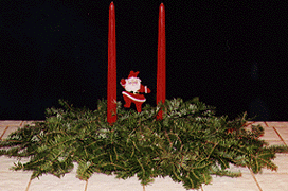
Start with your candles. Place them as shown in the photograph. It is easier to add them early in the design, pushing them directly into the styrofoam, rather then trying to get them through the foliage later. Candles used in these kinds of designs are intended for decorative use only. They are not to be lit. Furthermore, we often will cut the wicks to emphasize that point. This should be made very clear to the end user of the design (especially if you are giving this to someone as a gift). Add your foliage. Start on the ends of the design. To attach the foliage, cut small hairpins (U shapes) using #20 wire, and hairpin the foliage down to the base.
The distance that you come out on the ends will ultimately determine how large this design may become. The farther out you come, the longer and bigger the unit will be.
Connect the two ends with foliage as shown in the photograph.
Add any little Santa or reindeer novelties at this point.

The design needs some ornaments to jazz it up!!
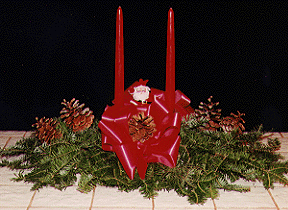
Make bows using #40 ribbon. Make a few loops on either side. Pick one bow on
one side of the styrofoam base, and the second on the other side.
Add wire handles to the cones. Take #20 wire and tie it around the base of each cone. Tape the cones together with floraltape. Stick the stem of the cones into the base of the design and bend the cones down to place. Add a few hairpins over the stem of the cones, to mount them securely in the base.
Add your glass balls through the design. These should all be individually taped and then taped together in clusters. They can be kept in uniform colors, or mixed together.
Distribute them through the design.
 You may leave the foliage plain, or may use some artificial snow to heighten the "wintery effect." You may leave the foliage plain, or may use some artificial snow to heighten the "wintery effect."
The neat thing about this kind of design is that you have so many great options. Use a longer piece of styrofoam and three or four candles and you have a nice mantle piece.
Change the kind of candles. Use a single large candle or many very thin tapers.
Vary your props. While we are showing reindeer and Santa, all kinds of neat designs could incorporate little animal toys or even angels.
The design could also be shaped in the form of a square, or even a circle. Use a styrofoam wreath as a base and you have an entirely different effect.
We hope that you really enjoyed this brief floral design lesson. At
Rittners School of Floral Design
in Boston we provide floral design instruction that includes a wide range of different styles and techniques. Please come and take one of our hands-on workshop programs!!
Rittners Floral Education Center returns you to our Floral Education Center.
Your Webmaster is Dr. Steve Rittner, who may be reached at Stevrt@tiac.net.
All photographs and text on this page are Copyright - Rittners School,
and may not be reproduced, or used for any commercial purposes.
|