|
Rittners School Of Floral Design
In Boston Presents....
 How To Make A Simple How To Make A Simple
Line Vase Arrangement
This is a very easy vase arrangement to make, yet it is very stylish. We call this kind of design a line arrangement. Line arrangements are designs constructed in various geometric shapes such as L's, upside down T's, triangles, S curves, horizontals, verticals, and so forth. In this example you see a very clear example of a tipped triangle. In the trade we also sometimes use another term for line designs. We also call them "high style designs." Same designs, but the wording sounds a bit snobbier!!
What You Will Need
Container
1/3 block of foam
12 carnations
3 croton leaves
A little statice
baker fern
We start this design by placing our piece of foam into a container. The base that we are using is a small cube shaped plastic holder that is relatively inexpensive. Approximately one third of a block of foam is all that really is needed given the size of our container. Of course you may use a container that is slightly bigger or smaller to stylize your design, and will have to adjust the amount of foam you use accordingly. In doing any floral design it is very important to cover our mechanics. That means that we don't want alot of the base in which we are working (eg. the foam) to show.
It's considered bad form in the floral world to have your mechanics exposed...almost like walking down the street with your underwear showing!!
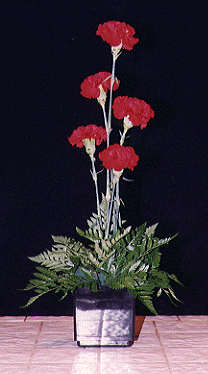
 To cover our mechanics we are using a foliage called baker fern. The fern itself is a much larger foliage than you see in the picture. We break the larger piece of foliage into smaller side shoots, and place them into the sides and top of the base. In this photo most of our mechanics are covered. We left a small portion open so that you could see the process. To cover our mechanics we are using a foliage called baker fern. The fern itself is a much larger foliage than you see in the picture. We break the larger piece of foliage into smaller side shoots, and place them into the sides and top of the base. In this photo most of our mechanics are covered. We left a small portion open so that you could see the process.
Next we start with the placement of our flowers. The major flower in this design is our carnation. Place one flower, the tallest one, in the center of the base. Next place another carnation a little lower to the left, and another a little lower to the right. The fourth flower is placed to the left of the first three, and the fifth a little to the right, as illustrated in the photograph. The easiest way to remember this is that the overall effect is almost like a winding flight of stairs.
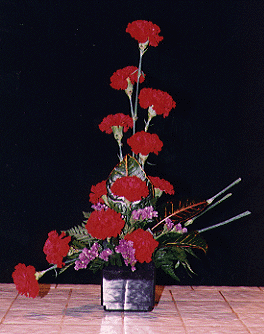
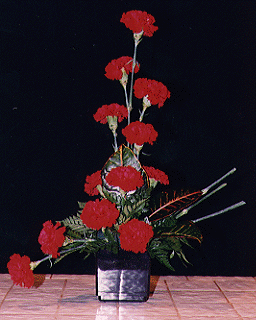
 The design so far consists of alot of flowers on the top, but you need some towards the baseline as well. Three flowers are placed at about the same level in the middle of the design. Four are placed at the base of the design, with two of those four extended out towards the left. The overall effect of these twelve carnations is a very simple L shape vase arrangement. We could stop the design at this point, or add a second flower, emphasizing the L shape. The design so far consists of alot of flowers on the top, but you need some towards the baseline as well. Three flowers are placed at about the same level in the middle of the design. Four are placed at the base of the design, with two of those four extended out towards the left. The overall effect of these twelve carnations is a very simple L shape vase arrangement. We could stop the design at this point, or add a second flower, emphasizing the L shape.
We want to show you how you can develop this simple arrangement into something a bit more interesting. We start by adding three croton leaves that we have cut from a plant that we had on hand. One is placed into the center of the design between several carnations. Two are extended out towards the right side of the design. We could stop at this point if we wanted. One is placed into the center of the design between several carnations. Two are extended out towards the right side of the design. We could stop at this point if we wanted.
On the other hand, let's take a few stems of carnations that were already cut. Rather than discarding the stems, extend them out at an angle towards the right side of the design. This is rather neat as we're making practical use of something that would normally be discarded. It makes the design much larger as well. If you draw an imaginary line from the top carnation to the bottom left carnation on the left side, and from the top carnation to the carnation stem on the right side you can see a tipped triangle. It is very clean looking and stylish. The design could be considered finished at this stage as well.
 On the other hand, to create additional visual interest let's add a few stems of statice down near the base. The contrast in shape, color and texture is quite striking. Only a few pieces of the statice are needed for the desired effect. On the other hand, to create additional visual interest let's add a few stems of statice down near the base. The contrast in shape, color and texture is quite striking. Only a few pieces of the statice are needed for the desired effect.
Although we used carnations in this design to stylize something that would fit quite nicely on most tables, this design can be scaled to fit any environment. Some large chrysanthemums could be used to make a very large design with the same overall pattern that would be ideal for a church and/or wedding decoration. Instead of using a round face flower one could use spike flowers such as glads to come up with a different kind of look. Consider how this design would appear if we stylized it with anthurium (the exotic flower shaped somewhat like a heart). Thus material selection can be varied depending upon both the desired size and atmospherics!!
We hope that you really enjoyed this brief floral design lesson. At Rittners Floral School in Boston we provide floral design instruction that includes a wide range of different styles and techniques. Please come and take one of our hands-on workshop programs!!
Rittners Floral Education Center returns you to our Floral Education Center.
Your Webmaster is Dr. Steve Rittner, who may be reached at Stevrt@tiac.net.
All photographs and text on this page are Copyright - Rittners School,
and may not be reproduced, or used for any commercial purposes.
|